

Getting Started
Connect your TradingView alerts to your broker account, with MT5 hosted for you.
PineConnector routes your alert instructions. Edge runs MetaTrader 5 (MT5) and the PineConnector EA for you. Your trading account stays with your broker.
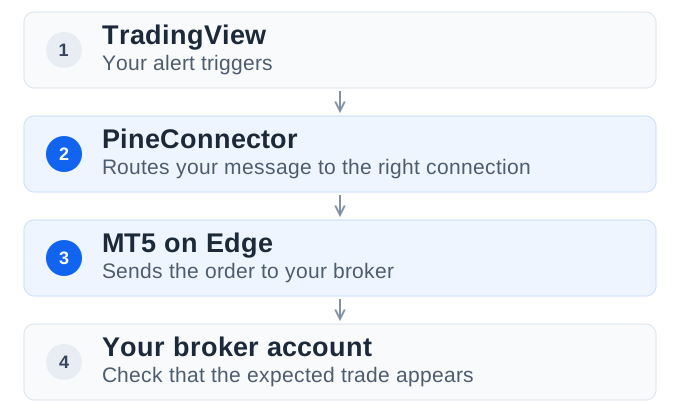
Follow one alert from TradingView to the trade you verify at your broker.
1. What You’ll Need
- PineConnector: a Core or Plus subscription with Edge. Pro is coming later. Open your Portal →
- Your broker: an MT5 account, demo or live, with its login, password, and server name. Expert Advisors must be permitted.
- TradingView: webhook notifications available and two-factor authentication enabled. Check your TradingView plan →
Recommended: start on demo. Check one complete alert before moving to live automation. You can choose either account type.
Check TradingView before you start
- Open the TradingView plans page and check that your plan includes Webhook notifications.
- Enable two-factor authentication on your TradingView account.
- Open an alert’s Notifications settings. You should be able to enable Webhook URL.
2. Connect Your MT5 Account to Edge
Already connected to Edge? Start at Step 3.
- Open Edge in your PineConnector Portal and click Add Instance.
- Select the License ID you want to use. This identifies your PineConnector connection.
- Give the connection a name. Enter your MT5 account number, trading password, and broker server.
Use the details supplied by your broker, not your TradingView or PineConnector login.

Portal → Edge → Add Instance. Give the connection a recognisable name, then enter your MT5 account number, trading password, and exact broker server.
Click Go live and wait for Edge to prepare your MT5 environment.

Example confirmation screen. Look for “Your instance is live,” then continue to finish setup.
Check the account number and broker. “Live” means the instance is running; the broker account can still be demo.
Before any test, check the account. A live account uses real funds. Confirm the intended account and License ID; other terminals sharing that license may also receive the instruction.
Optional: quick check in the Portal. In Connections, select your Edge account and use Send Test Signal. Check the result at your broker. You can skip this and run the full TradingView test below.
The remaining steps connect TradingView to this same account.
3. Prepare Your TradingView Message
Open Connections, find your Edge account, and use Copy LicenseID beside its license number. This ID tells PineConnector where to send your instruction.

Earlier Portal layout, with identifiers masked. In the current Portal, use the copy icon beside the License ID assigned to your Edge account.
Choose what you want to trade. Use the exact symbol name from your broker, such as EURUSD or EURUSD.a. Then fill in the card below and copy your message.
Check that the symbol’s market is open and the volume is permitted by your broker.
4. Send the Alert from TradingView
An alert sends your message when a TradingView condition is met. The webhook URL tells TradingView where to deliver it.
- Open a TradingView chart and click Create alert in the top toolbar. Shortcut: Alt+A on Windows or Option+A on Mac.
- Set Condition to Price → Crossing and choose a nearby price you can observe being crossed. Set Trigger to Once only.
- Click Message, paste your message from Step 3, and click Apply. Use an alert name such as “Edge demo test” so you can find it later.
- Click Notifications, enable Webhook URL, and paste the address below. Click Apply to return to the alert.
- Review the account, symbol, volume, message, and webhook URL, then click Create. The alert sends only when its condition triggers.
- Open Alerts → Log. Find “Edge demo test” and check whether it triggered and whether the webhook was successfully delivered. Then verify the trade in Step 5.
https://webhook.pineconnector.com
One test at a time. Keep one test alert active. If it has not triggered, review the price condition before troubleshooting PineConnector.
TradingView alert setup help →

A Portal test checks only part of the journey. Send an alert from TradingView to verify its message and webhook setup too.
5. Verify the Trade and Finish the Test

Example signal history. These older entries show CLOSELONG; the buy test above should show BUY. Match your own alert’s time and account.
- Check PineConnector. Open Bridge, find your signal by time and account, and check the result.
- Check your broker. Open the same account in your broker’s supported MT5 mobile app, web terminal, or desktop terminal. Confirm the account, symbol, buy direction, and volume, with no unexpected duplicate trade.
Close the test position and disable or delete the test alert when finished.
Your setup is ready when: the TradingView alert reaches the intended account and produces exactly the expected trade. A Connected badge or received signal alone is not the finish point.
No trade? Check these in order
- TradingView: Did the alert trigger, and was the webhook delivered? Check Alerts → Log, then review the message and webhook URL.
- PineConnector: Does the License ID match the intended account? Check Bridge for errors.
- Broker: Check the exact symbol, market hours, permitted volume, and available margin.
- Authentication: If enabled, check that the signal secret matches.
Before retrying, check the broker account for an existing position so you don’t repeat a successful trade.
For support, share the alert time and timezone, error message, and a screenshot. Do not share passwords or secret keys.
Next: Automate Your Own Strategy
After the test passes, choose the guide that matches your TradingView script:
- No access to the script’s code? Start with the no-code alert guide.
- Can edit the script? Use the low-code alert guide.
Keep the same webhook URL. Test your intended entries, exits, symbols, and position sizes before relying on live automation.
Help Us Improve This Guide
For setup problems, use the support chat above. To share feedback about this guide, use the form below.